Support Ticket Screenshot Checklist: What Is Better to Capture For Reproducing the Issue
Why a “Screenshot Pack” Solves Support Tickets Faster Than a Single Image
A single screenshot can show what looks wrong, but it rarely shows why it’s happening. Support teams don’t fix pixels. They fix reproducible conditions: the exact app state, window focus, OS session, and display setup that trigger the issue. That’s why a Support Ticket Screenshot pack (not one image) gets tickets resolved faster with fewer follow-up questions.
Here’s the pattern support sees every day: the screenshot looks real, the bug looks obvious, and yet nobody can reproduce it. The missing pieces are usually boring but critical: which screen it happened on, whether scaling is enabled, what the app was doing right before the glitch, and whether the capture tool grabbed the same surface you saw.
A screenshot pack closes that gap by giving support a short “timeline”, not a single moment. Instead of guessing, they can verify:
- The issue is consistent (or intermittent).
- It happens on a specific monitor or layout.
- It’s linked to a particular step in the flow.
- It’s tied to the OS/session behaviour (especially on Linux).
Why one image fails in real support work
Multi-monitor setups are the classic trap. People say “it captured the wrong thing,” but the screenshot doesn’t prove which monitor was intended. That’s why “single monitor” context matters not as a keyword, but as evidence. If your pack includes one quick “display layout” screenshot plus the actual capture, the support engineer can reproduce your environment instead of guessing.
Linux adds another layer. On Ubuntu, screenshot behaviour can change based on session and permissions, so support often needs a bit more context than “here’s the image.” When someone reports anUbuntu Linux screenshotissue, a pack that includes the capture attempt and the relevant system context usually saves an entire back-and-forth.
Screenshot pack vs. single screenshot (what support actually needs)
| What support needs | Single screenshot | Screenshot pack |
| Exact steps right before the issue | Usually missing | Included as 3-6 short frames |
| Which screen/window was targeted | Often unclear | Confirmed with display context |
| App state + focus | Easy to misread | Verified across a sequence |
| Proof it’s repeatable | Looks “random | Shows the issue happening in order |
| Faster triage | More questions | Fewer questions |
If you want support to move fast, don’t aim for a “perfect” image. Aim for a complete one.
The Support Ticket Screenshot Checklist Mindset: Context First, Details Second
Most “can’t reproduce” support replies happen for one simple reason: the report shows details, but not context. ASupport Ticket Screenshotchecklist isn’t about making prettier screenshots; it’s about packaging the minimum context that lets support recreate your environment in minutes.
Think of it like debugging: the close-up is useful after you know what system you’re looking at.
So the mindset is:
1) Capture context first (the environment);
2) Capture details second (the bug).
Context first: prove where the issue happened
Before you zoom in on the bug, give support a fast “map” of the situation:
- On which screen did the issue occur (especially with multiple monitors)?
- Which window was active and in focus?
- What did the UI look like right before the bug (one step earlier)?
- What changed (the click, keypress, toggle, or action that triggered it)?
This is where “single monitor” clarity matters. If you’re trying to show only one display, make it obvious you intended a single screen capture, not the whole desktop spread. One simple way is to include a quick “desktop overview” frame first, then the actual capture of the target screen. It instantly reduces confusion around a screenshot scenario.
Details second: Zoom in only after the story is clear
Once support understands the environment, then the close-ups become powerful:
- error banners or dialogue text (fully visible);
- affected UI controls and their state (on/off, selected values);
- system indicators that change behaviour (zoom/scaling, network/VPN, permissions prompts).
A good pack often includes 3-6 images total:
- overview/context;
- pre-step;
- the moment;
- close-up;
- optional system/settings proof;
- optional result state.
Ubuntu notes (keep it practical, not noisy)
On Linux, the “context first” rule is even more important because screenshot behaviour can depend on the session and capture permissions. If your issue is on Ubuntu, include one context frame that makes it clear what you’re capturing and what you expected and that small addition often prevents a long thread of “try another capture method.” (This matters for any Ubuntu screen snapshot report.)
The checklist mindset in one line
A Support Ticket Screenshot checklist should answer support’s first three questions without asking you anything:
- Where did it happen?
- What did you do right before it?
- What exactly should we be seeing instead?
If those are obvious from your screenshot pack, your ticket stops being “an image” and becomes a reproducible case.
Tip: On multi-monitor setups, using a tool like PixelTaken to capture only the affected screen/window keeps your Support Ticket Screenshot pack clean and easier to reproduce.
Reproduction Clarity: How Support Interprets Steps, States, and UI Changes
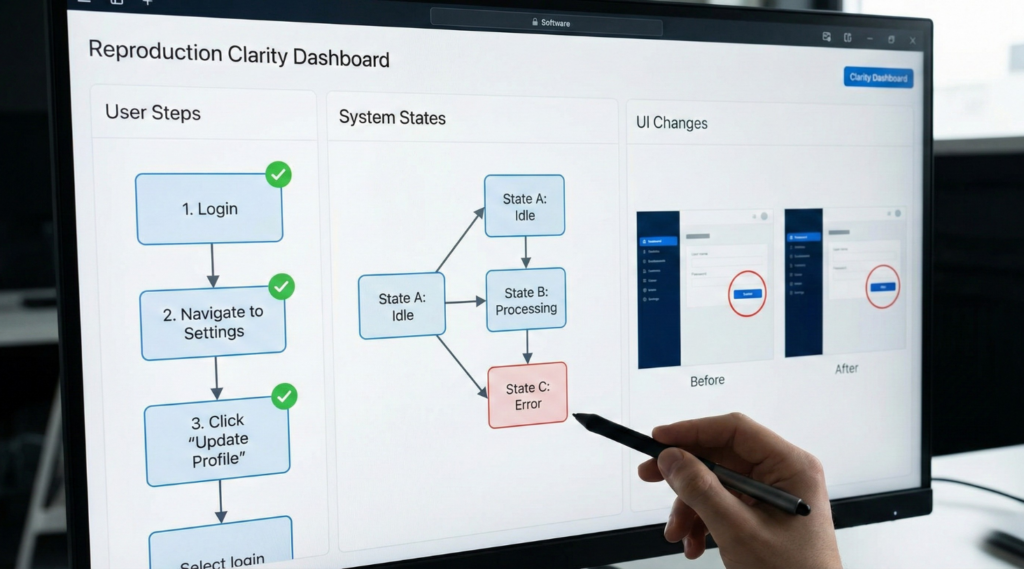
A Ticket Screenshot only helps when it answers the one question support teams care about: can we reproduce the issue reliably? Reproduction clarity comes from three inputs: the exact steps, the current state, and the visible UI change after the trigger.
How does support “read” your screenshots?
Support engineers review images like a timeline:
- Before state: what the screen looked like right before the issue
- Trigger: the exact click/shortcut/toggle that caused the change
- After state: the visible result (error message, missing element, wrong layout)
If you only send the “after” image, the ticket turns into a guessing game, especially for UI bugs that depend on OS session details.
The 3 essentials for reproduction clarity:
1) Entry point (where you are in the UI)
Include the screen title, active tab, or menu path, so support doesn’t have to infer context. This matters a lot for capture-related issues like Ubuntu Linux screenshot problems, where the same app behaves differently depending on the session and permissions.
2) State (what’s true about your setup right now)
Most “can’t reproduce” cases come from missing state info. Your screenshots should make these visible when relevant:
- Wayland vs X11 session (common root cause for how to take a screenshot in Ubuntu issues);
- Multi-monitor layout and scaling (critical for screenshot single monitor requests);
- App mode/permissions (Flatpak/Snap sandboxing often affects Ubuntu screen grab behaviour);
- Network/VPN/remote desktop (can change capture behaviour).
A single “environment” screenshot often prevents multiple back-and-forth messages.
3) UI delta (what changed after the action)
Support wants a clear A/B comparison. Describe or show the delta:
- “Button becomes disabled after step 3”;
- “Window goes blank”;
- “Nothing happens when I press the shortcut”;
- “Screenshot shows the wrong screen/monitor”.
If the issue is “wrong monitor captured,” explicitly show that you intended a print screen single monitor result.
The simplest screenshot order that works
Use a 4-shot sequence (it’s fast, but extremely effective):
- Context: The app window displays your current location (the “before”).
- Trigger-ready: UI right before the click/shortcut.
- Result: the error / wrong UI / missing state (“after”).
- Environment: Display settings or system information if relevant.
For multi-monitor problems, like how to screenshot one screen, include your display arrangement once, so support understands what “single monitor” means in your setup.
PixelTaken tip: make reproduction screenshots consistent
PixelTaken helps when you need repeatable, clean captures: you can grab a screenshot of a single monitor or a specific window consistently, which keeps your “before vs after” images aligned and avoids accidental leaks from other displays. That’s especially useful when diagnosing capture complaints on Ubuntu (the classic Ubuntu screen snapshot), because support can compare UI changes without noise.
Environment Signals That Matter: OS, App Version, Scaling, and Multi-Monitor Setups
When a Support Ticket Screenshot doesn’t lead to a quick fix, it’s usually because the environment is different on the support side. Two users can follow the same steps and still get different results if the OS session, display scaling, or monitor topology changes the UI or screenshot pipeline. Your goal in this section is to capture the signals that explain why the issue happens on your machine.
The “environment signals” support teams check first
Support typically tries to classify your report into one of these buckets:
- OS/session behaviour (e.g., Wayland vs X11 on Ubuntu);
- App build differences (version, packaging, sandboxing);
- Rendering differences (scaling, fractional scaling, DPI);
- Multi-monitor capture logic (which screen is “primary,” where the cursor is, which monitor is active).
OS + session: the screenshot pipeline changes here
For Linux, the single most important detail is the session type because it affects how Ubuntu Linux screenshot tools are allowed to capture.
Include:
- Ubuntu version + desktop environment (e.g., Ubuntu 24.04 GNOME);
- Wayland or X11 session;
- If relevant: whether the app is Flatpak/Snap (sandbox rules often explain how to take a screenshot in Ubuntu issues).
This is also why some users report that Ubuntu screen grab works in one tool but not another; the capture route differs.
App version + packaging: same app name, different behaviour
Support needs to know what exact build you’re running:
- App version number + build (if visible);
- Install type: Flatpak / Snap / Deb / AppImage;
- Whether the app was updated recently (bugs often correlate with version jumps).
Even on Windows/macOS, version and channel matter. On Linux, it can be decisive for Ubuntu screen snapshot failures.
Display scaling: the invisible cause of “wrong UI” and “wrong crop”
Scaling affects:
- Where do UI elements render?
- Where do click targets land?
- How do screenshots get cropped or stitched?
- Whether a capture grabs the correct monitor?
Include:
- Display scaling % (especially fractional scaling);
- Resolution per monitor;
- Whether scaling differs between monitors (a common reason screenshots “look wrong”).
Multi-monitor setup: capture issues are usually topology issues
For multi-display bugs, support wants the “map” of your desktop, not just the screenshot.
Capture these signals:
- Number of monitors + arrangement (left/right/stacked);
- Primary monitor (which one is set as primary);
- Different refresh rates (sometimes affect capture timing);
- External displays (dock/HDMI/DisplayLink).
Why it matters:
A single monitor screenshot can mean different things depending on what the OS considers “active.” If someone is trying to print screen one monitor but the tool captures both, it’s often because the monitor roles or layout are different from what was expected.
The minimal screenshot set that saves time
When environment matters, don’t send 10 random images; send a small, structured pack:
- Issue screenshot (the problem);
- App version screen (About / Help – version);
- Display settings screen (shows scaling + monitor arrangement);
- OS/session info (Ubuntu “About” page or system info).
That’s enough for support to reproduce or immediately route the ticket correctly.
PixelTaken tip: capture “one monitor” evidence cleanly
If the issue involves multi-monitor capture, PixelTaken is a practical tool because it’s designed for controlled capture: you can consistently grab a single display or specific window without accidentally including other monitors. That makes the evidence clearer and keeps your screenshots safer when you have sensitive stuff open elsewhere.
Proof Beyond the UI: Errors, Logs, and Network Clues That Confirm the Cause
A screenshot for support is the fastest way to show what you see. But the fastest way to prove why it happens is to attach one more layer of evidence: the error output, a relevant log line, or a network clue that confirms the root cause. This is how your ticket moves from “cannot reproduce” to “actionable bug.”
Why does support ask for “proof”
UI bugs can look identical while coming from totally different causes:
- permissions vs. app crash;
- backend outage vs. local network/DNS;
- rendering glitch vs. display scaling;
- Wayland screen-capture rules vs. a broken screenshot tool.
So support teams look for signals that narrow the diagnosis in minutes.
The three evidence types that resolve tickets fastest
1) Error messages that include a timestamp or code
Don’t paraphrase the error; capture it as-is.
Include:
- The full error dialogue (expanded, if possible);
- Any error code, request ID, crash ID, or “trace” snippet;
- The exact time it happened (even “~13:42” helps correlate logs).
PixelTaken tip:
If the dialogue is small or hard to read, capture the window cleanly (not the whole desktop), then add a second shot with the surrounding UI context. That keeps screenshots readable and avoids accidental multi-monitor capture.
2) Logs that show a failure reason (not a wall of text)
Support rarely wants your entire log file. They want the few lines around the failure.
What’s helpful:
- The app’s own “Logs / Diagnostics” screen (best).
- System logs around the moment of failure.
- A short excerpt that includes: timestamp, component, and error message.
If you’re on Ubuntu and screenshots behave oddly, logs can also confirm whether the portal/sandbox flow failed, useful context when someone says “Ubuntu Linux screenshot doesn’t work”, but the real issue is the capture chain, not the UI.
3) Network clues that prove backend vs. local environment
A lot of “UI bugs” are actually network conditions in disguise.
Include:
- “Offline” indicators, timeouts, or “failed to fetch” messages.
- Whether it happens on another network (mobile hotspot vs Wi-Fi).
- Region/VPN usage (if applicable).
- If only one feature fails (login works but upload fails), mention it.
This is especially important when you’re reporting an issue that only reproduces under specific conditions (corporate firewall, hotel Wi-Fi, captive portals, etc.).
How to attach this evidence without overwhelming the ticket
Keep it tight. A strong “proof pack” is usually:
- Issue screenshot (what’s wrong);
- Error message screenshot (code + timestamp);
- Log excerpt (5-20 lines around failure);
- Network clue (timeout screen, status page, or “works on hotspot” note).
That’s still a small bundle, but it’s enough to confirm the cause.
When “single monitor” matters here
If you’re documenting logs or network tools while working on multiple screens, make sure your capture doesn’t leak other windows. Use a single-display or window-only workflow (this is where PixelTaken is handy), so your evidence stays clean and focused, especially when you’re trying to figure out how to screenshot only one monitor without grabbing the rest of your desktop.
Packaging Like a Pro: Structure, File Naming, and Privacy (Without Over-Explaining)
Make the pack readable in 10 seconds
A Support Ticket Screenshot is only useful if the person on the other side can open it, understand it, and trust it in under a minute. That’s what “packaging” does: it turns a pile of images into a small, reproducible story without leaking sensitive info.
Use file names that explain the story
Good naming removes back-and-forth. Use a simple pattern. Numbering is the fastest way to prevent confusion:
- 01_issue.png;
- 02_before.png;
- 03_settings.png;
- 04_error.png.
If you’re sharing a multi-display context, add a plain label like monitor1 or single-monitor.
Keep privacy by design: capture less, not more
When possible, capture a single window or a single display instead of a full desktop. It reduces accidental leaks and makes the screenshot more “actionable” because the signal is concentrated.
If you must blur:
- Blur emails, phone numbers, addresses, tokens, order IDs, and full names (unless required).
- Don’t blur the exact UI element that demonstrates the bug.
Where PixelTaken fits naturally
Support doesn’t need cinematic coverage; they need consistency. Use the same capture method for all images so state changes are comparable.
PixelTaken is a solid everyday tool here because it helps you produce consistent, “minimal but complete” captures, especially when you need a print screen single monitor without grabbing everything across multiple displays. The result looks cleaner, shares faster, and avoids the back-and-forth that happens when a screenshot raises new questions.
Optional: zip it, label it, and add a 2-line index
If you send more than 4 images, zip the bundle and include a tiny index in the ticket:
- What broke: (1 sentence);
- How to reproduce: (2-4 steps);
- Attachments: 01 issue, 02 before, 03 environment, 04 proof.
It reads fast, it’s professional, and it increases your chance of a quick resolution.